Kryptonic Dragon on Discord wrote:
Using a 100W, 10-foot Dell laptop power adapter for a raspberry pi feels a tad overkill but I don't have anything else that outputs more than 5V/2A...


Instead of a new costly 24V power supply, you could reuse a few 19-20V laptop power bricks?
Help, I got myself stuck trying to figure out which 2A continuous, 24V-5V buck converters I should buy. I previously purchased these DROK 12V-5V buck converters (which I need to return), but from the 24V versions I'm considering, none seem to stand out (especially since they're mostly adjustable):
  • eBoot Mini MP1584EN DC-DC Buck Converter Adjustable Power Supply Module 24V to 12V 9V 5V 3V (6 Pack) (also comes in a 12-pack): $1.17 to $1.38 per piece. 3A max, claims 92% max efficiency, which means nothing. Seem decent from reviews, QA sounds iffy, at least one reviewer claims they fail safely (i.e., not passing Vin -> Vout). As with others, I'm worried about the warning to not use them with small/zero load, although since the WS2812B uses ~400-500uA when not illuminating, perhaps the >=13.2mA a set of 33 would draw together would be enough to eliminate any danger. A few reviews claim the filter cap can't handle 24V and pops; others say it works. Output voltage potentiometer is apparently very finicky.
  • Wolfwhoop PW-D Control Buck Converter 6-24V to 5V 1.5A: $2.50 each. Extremely tiny, would fit well in my channels. Reviews seem more consistently high, but with needing some 39 of these, that would set me back $100. Can only deliver up to 1.5A. Has JST connectors that I'd probably want to remove (or start incorporating!).
  • 5v Regulator, DROK 5pcs Mini Voltage Reducer DC 4.5-24V 12V 24V: $1.80 each. Also very small, although it has a pot, solder jumpers are provided for fixed output voltages. Sounds like the output voltage drops a bit under load, but I'm not toooo concerned about that.
  • 5V Regulator Module Mini Voltage Reducer Adjustable DC 4.5 - 24V 12V 24V to 5V 3A Volt Buck Converter: $0.85 to $1.60 each. Looks like a clone of the DROK regulator (or vice versa?), reviews complain about manufacturing quality a bit, but potentially perfectly serviceable and a great price ($34 for everything I need).
  • Valefod High Efficiency 3.0-40V to 1.5-35V Buck Converter: $1.60 to $1.83 each. Much bigger in every dimension than the above, uses bigger LM2596 (supposedly), while the others were possibly using the MP2315. Although they won't fit into channels (which have a 10.5mm surface for the strips, and even the two outside surfaces are only 16mm deep, the slightly more robust look appeals to me.


Any feedback on these or other options would be greatly appreciated!
Given we previously noted that DROK isn't completely no-name and seems to be decent quality, I'd think basically just swapping your 12V ones for similar 24V seems fine and easy. I'd agree that the "weewooday" ones are probably DROK clones, which might be okay if you're feeling lucky. Personally, I'd avoid the clones.

It also looks like they're a little cheaper if bought directly from DROK.
Thanks for the feedback, Tari! I've purchased 5 of them for experimentation. In the end, I grabbed them directly from Amazon, because free Prime shipping has a bigger impact on the price than the lower per-item price from DROK directly.
*bump* Components have arrived, including a Mean Well supply. Everything works together: the Mean Well produces nice clean 24.00V (it has a little pot to dial it in) and doesn't dip down measurably under load, the tiny DROK buck converters do a good job of generating 5V up to (so far) 1.3A, although the inductor gets quite toasty delivering 1.3A continuous, and an Arduino happily lights up the LEDs.

However, I'm consistently seeing each WS2812B only pull 33.4mA at 5.00V when instructed (by FastLED) to display white. I made sure the FastLED brightness adjustment is set to 255, I've checked the input voltage, and I'm still seeing barely half of the current draw I expect. By turning on elements individually, I'm seeing 5mA-8mA for the red element at full brightness, 5mA-10mA for the green element at full brightness, and 11mA-13mA for the blue element - with a sum that's pretty much always 33mA-34mA, so the variance in the other measurements is probably the precision of my Fluke 79 multimeter. Based on a quick Googling and finding this blog post, it looks like I have the kind that uses less current (??). Which changes my power budgeting a bit.
Glad to find out you have the low current versions, that simplifies things. Also, post pics when you can, we would love to see your room lit up like an RGB disco!
It definitely simplifies things and/or gives me a larger safety margin (if I choose to use the same number of buck converters and the same wire gauge), but I worry I'm paying the price of half the luminance: 33 LEDs on at full white doesn't produce a *huge* amount of illumination.

I'll post pics when I can, but I'm nowhere near the full setup yet. The next item to figure out will be how I can mount the buck converters + LED strip + power wires in the aluminum channel (3D printed brackets?) and how I can use the aluminum channel as a heatsink for the buck converters.
I also meant to share my power results in more detail. I tried measuring current and voltage with a strip, powering a selection at mostly white (and once using FastLED's FairyLight color, FFE42D). In these example, I had placed the LED strip into an aluminum channel, but hadn't removed the backing on the adhesive strip to attach it, and thus I expect that heat transfer was not as good as it will be in the finished version.


Code:
1.586A - 60x FairyWhite. Buck converter gets warm to the touch in air, dissipated by touching it

2.214A - 60x White. Buck converter gets hot to the touch in air, bearable to touch.
2.108A - 57x White. Same. \
2.044A - 55x White. Same. |- Channel gets warm as well.
2.005A - 54x White. Same. /
I have now twice learned the lesson that reconnecting my 24V power supply while it is powered causes the DROK buck converters to emit a puff of magic smoke. Something something inrush current? Dunno.
It has been far too long since I updated this thread. Since I last posted, I decided that I didn't want to construct LED strips to cover the entire perimeter of the room, moved to a different apartment with a built-in shelf perfect for placing a strip of LEDs on top, constructed a set of modular strips, and today, built a little controller. In a future post, I'll add a more comprehensive update on the engineering of the modular strips, why I'm pretty happy with the design, and why they're terribly tedious to construct. At least I learned to socket the buck converters so I could easily swap them out when I made them emit the magic smoke!

A few days ago, I asked geekboy1011 his advice on controller hardware. PartyMode 2.0 used a home-grown Arduino-based controller, with a Bluetooth serial adapter interfacing to an Android app to control it. I wanted to spiff up the controller a bit, including making it respond to certain API-type events (for example, subtly flashing notification colors if emails or other types of messages arrived in my various accounts). Although I pondered ESP-based solutions and a few others, geekboy1011 strongly opined prioritizing convenience and prototyping speed over trying to use the least powerful hardware available to achieve the given goals, so I went with one of my Raspberry Pi Zeros that has been collecting dust for too many years. I used yet another of the buck converters to make 5V for it, removed the case from a tiny thumbdrive-style USB WiFi adapter, grabbed a USB port off of the Pi Zero's test pads, and topped it off with a 74LS32 hiding under the Pi Zero acting as a poor man's level-shifter to produce a 5V signal to control the LED strip. With rpi_ws281x, a simple rainbow control program is working nicely.
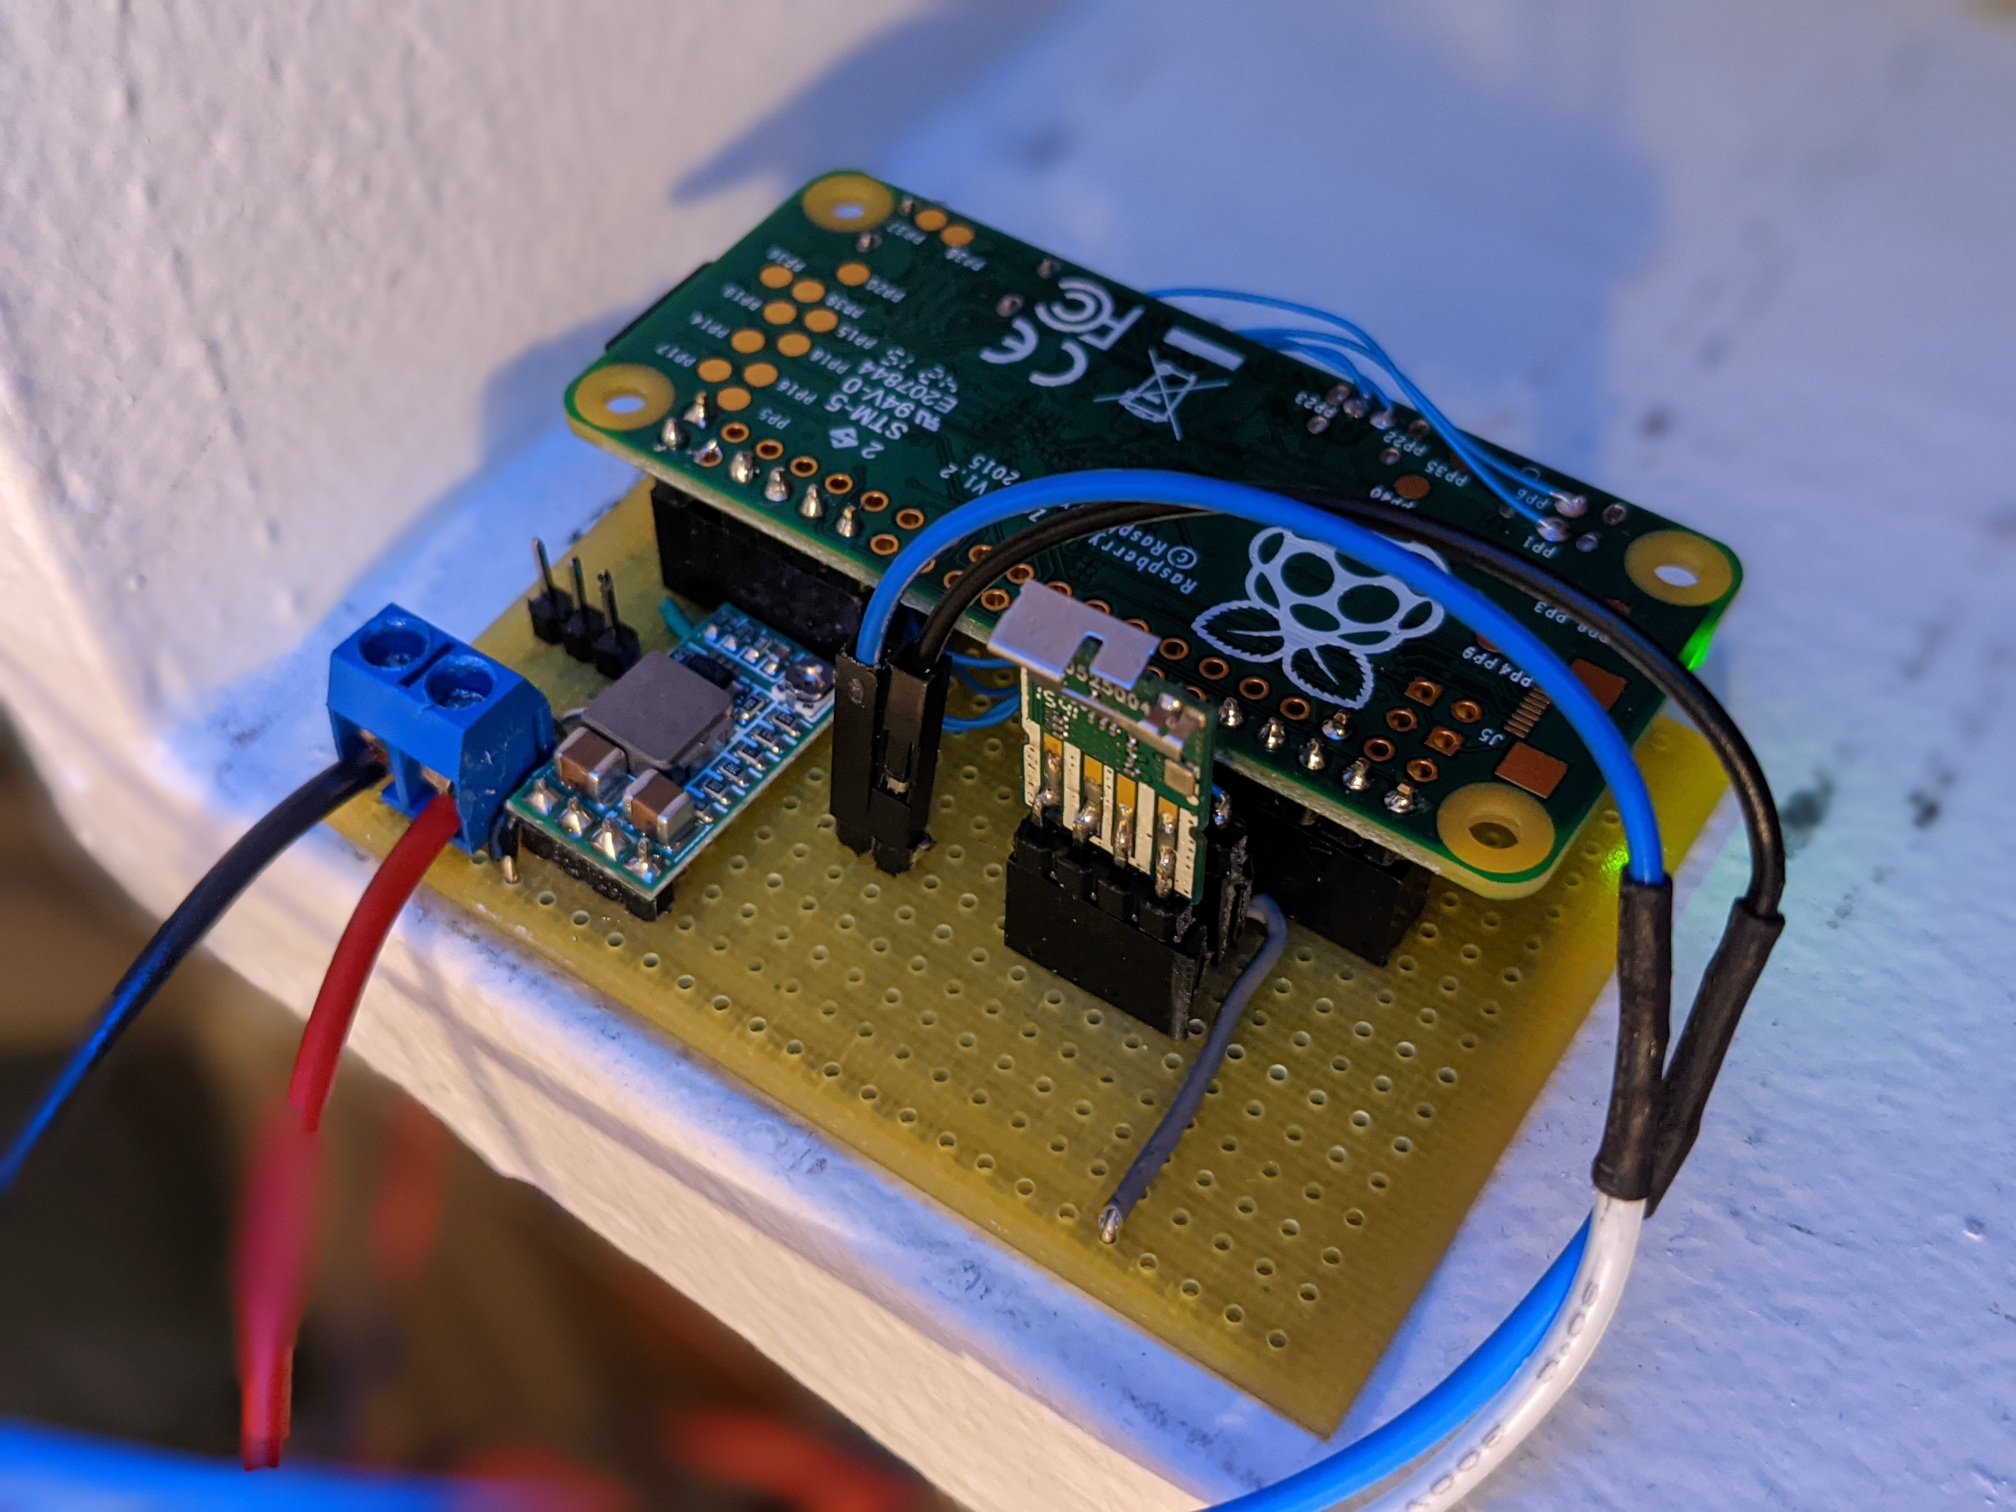
Although it seems you've already got a controller working and at the risk of derailing your progress, this is probably a good application for ESPhome: given just about any ESP8266 or ESP32 board supported by PlatformIO and a small YAML file that you write, you can build a firmware for that board to drive your LEDs and expose any of several different control interfaces (HTTP, MQTT).
Thanks for the suggestion! I'm going to stick with the Pi Zero-based controller for now, something something sunk cost. I've ported a few bits of functionality from PartyMode 2, in a PartyMode3 repo on Github:
  • A daemon running as root that controls the hardware, listening on a local socket for instructions.
  • A low-privilege webserver written in Python with simple controls that sends instructions to that daemon.
  • Static light modes: off/dim/bright, setting an arbitrary color, Christmas light string-esque.
  • A "sky light" mode that implements "A Practical Analytic Model for Daylight", Preetham et al, 1999 (https://www.cs.duke.edu/courses/cps124/spring08/assign/07_papers/p91-preetham.pdf) to either display a color modeled on the current color of the sky near the sun (e.g., warm colors at sunset and sunrise, cool colors at midday), or randomly light individual LEDs as "stars" at night.
I've poked at this more.
  • Occasionally this Pi Zero very annoyingly loses its SD card. If I have an active SSH connection, "ls" fails; if I don't, I of course can't SSH. The only solution is a reboot. A voltage check script shows no particular problems. I'm using one of the 5V DC-DC regulators I use to power the LEDs themselves for the Pi, which should be good for more than the 2.5A than the Pi requires at peak, but I don't know if perhaps it's sagging too much. Any advice would be appreciated!
  • I learned a little more about Python asyncio and made the skylight mode update once a minute, so that the "stars" twinkle once a minute, and the sun-like illumination will gradually change color and brightness throughout the day.

Code:
vcgencmd get_throttled (0x0)
vcgencmd measure_volts:
     core volt=1.3500V
  sdram_c volt=1.2000V
  sdram_i volt=1.2000V
  sdram_p volt=1.2250V
Temperature: temp=40.1'C
A neat way to sidestep SD card issues (because they're a major reason I wouldn't consider Raspberry Pis very reliable in general) would be to make the system run entirely from RAM, since I assume your application doesn't actually need very much memory.

To further improve the situation you could use Buildroot to build an OS image containing exactly what you need for the system, which (with some luck) should be small enough that you could simply put everything in a initramfs and only use the SD card to boot from.
That's a good suggestion. I'm still tweaking the driver software frequently enough that I wasn't planning on doing this yet, although it just occurred to me that I could always make it just check out my Github repo and perform any initialization/building at boot time.
Given that this is meant to be a version of PartyMode, the next thing I need to add is music reactivity. Since I don't plan to actually play music through it, I'd like to stream the audio or music that's currently playing on one or both of my two Windows machines to it, ideally as close to simulcast as possible. My assumption was that VLC would be the most friendly to simultaneously playing music locally and streaming the output to a network endpoint, but I haven't found it to be nearly as easy as I expected.

Any suggestions?
Since your sources are Windows, using WASAPI loopback capture to snarf output audio seems like a reasonable approach. You'd have to write a custom Windows application to grab the stream, but that seems like it would be pretty easy since Microsoft provide an example that's nearly ready-made for loopback capture. If you don't mind targeting only very recent versions of Windows, you can also specify a single process to capture the output from.

You might also find it easy to start with an existing open-source program to modify; at a glance VB Audio Router is one such application; its ProcessAudioCapture interface might be a convenient starting point for a C#/.NET application that meets your needs.

Once you've captured an audio stream you could pipe it to your lighting control thing as-is (or possibly run it through an encoder first), but if you're already grabbing the audio on the client you could just as easily do whatever processing you want on the client, and have it send straight lighting commands to the lighting device.

Even easier if you just want something approximating a peak meter (which it looks like your "Audio" mode in PartyMode 2 did), the Windows volume control APIs support peak meters directly as a typical feature of volume controls, so you wouldn't even need to process the audio stream yourself (and it's possible to get the volume controls for individual sources rather than a sink device, so you could limit it to a single application's peak meter).
After following that rabbit hole for a bit, I ran across https://github.com/duncanthrax/scream , which may save me the effort of writing something myself.

Edit: On the other hand, because I want a few specific tweaks like only sending data when my laptop is on a particular WiFi network, I may still need to customize this or make something entirely custom.
I haven't had a chance to work on the sound component at all, but I did add support for various color temperatures of illumination today.
  
Register to Join the Conversation
Have your own thoughts to add to this or any other topic? Want to ask a question, offer a suggestion, share your own programs and projects, upload a file to the file archives, get help with calculator and computer programming, or simply chat with like-minded coders and tech and calculator enthusiasts via the site-wide AJAX SAX widget? Registration for a free Cemetech account only takes a minute.

» Go to Registration page
Page 2 of 2
» All times are UTC - 5 Hours
 
You cannot post new topics in this forum
You cannot reply to topics in this forum
You cannot edit your posts in this forum
You cannot delete your posts in this forum
You cannot vote in polls in this forum


Advertisement